Installation
Step 1: Deploy Cartridges to Demandware
These steps shall be performed before you configure the cartridges. For the next steps, you need node.js 8.9.4 or above to be installed on your machine. You can use Salesforce UX Studio or Salesforce plugin in Visual Code to upload cartridges to an instance.
- Click the button below to download the zip file:
-
Open package.json from the root directory
-
Ensure the base path is correctly resolved to app_storefront_base, as shown below:
"paths": { "base": "../storefront-reference-architecture/cartridges/app_storefront_base/" } -
Open the command prompt and
run npm install -
Run
npm run compile:jsfor build js files -
Create the dw.json file in the root location where you downloaded the source code for the cartridge, as shown below:
{ "hostname": "YOUR_INSTANCE.commercecloud.salesforce.com", "username": "YOUR_USERNAME", "password": "YOUR_PASSWORD", "code-version": "YOUR_SITE_VERSION", "cartridge": [ "int_progressive", "int_progressive_sfra", "int_progressive_csc" ], "active": true, "autoUpload": true } -
Upload code with npm command
npm run uploadCartridgeor use an IDE
Step 2: Storefront Customization
If your website employs the default StoreFront Reference Architecture (SFRA), please be advised that Progressive's required template modifications will overwrite your site templates.
However, in the event that your website does not utilize the default SFRA, you can find step-by-step instructions for integrating the required code segments on our Storefront Customization page.
Step 3: Active Cartridges
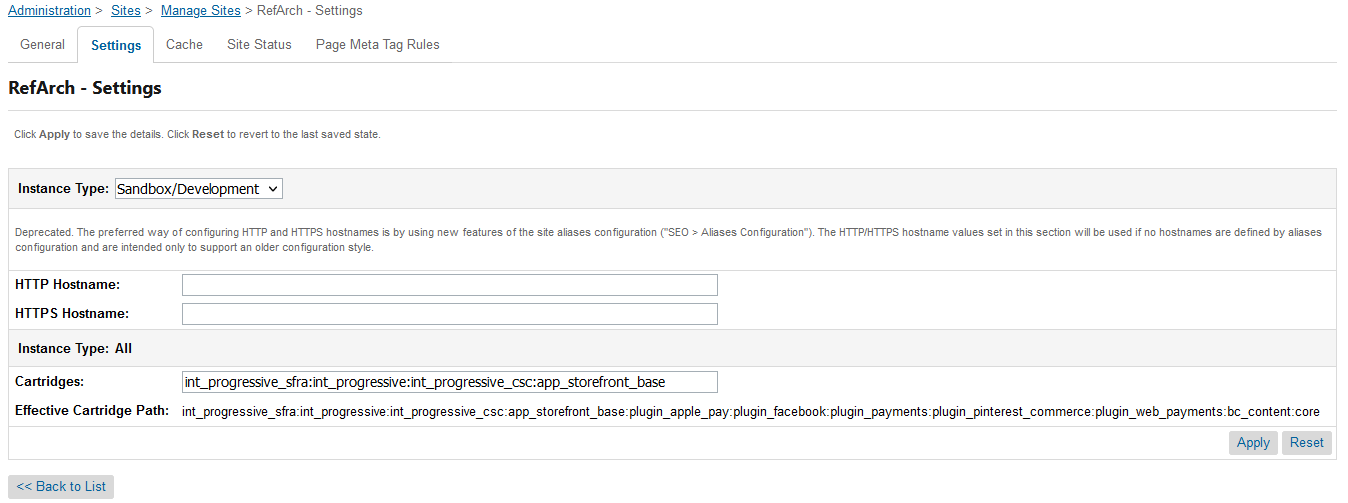
To make the Progressive functionality available to the reference architecture, you must add the cartridge to the cartridge path of the site. Follow the steps below:
- Log in to Business Manager
- Navigate to Administration -> Sites -> Manage Sites.
- Click on the site name and navigate to the Settings tab.
- In the Cartridges text field add the following text before other cartridges:
int_progressive_sfra:int_progressive:int_progressive_csc
The Progressive functionality also extends the standard center and order transaction capabilities. This step is needed to enable Customer Service Center functionality.
Follow the steps below:
- Navigate to Administration -> Sites -> Manage Sites.
- Click on the Business Manager
- In the Cartridges text field add after other cartridges:
int_progressive_csc:int_progressive:int_progressive_sfra

- Click on Apply button
Step 4: Import Progressive Leasing Metadata
- Upload and import progressive.zip from the metadata folder.
- Navigate to Business Manager > Administration > Site Development > Site Import & Export.
- Upload archive using Local option in the Upload Archive section.
- After upload choose progressive.zip in the list and click on the import button.

Step 5: Add Progressive Leasing Payment Method
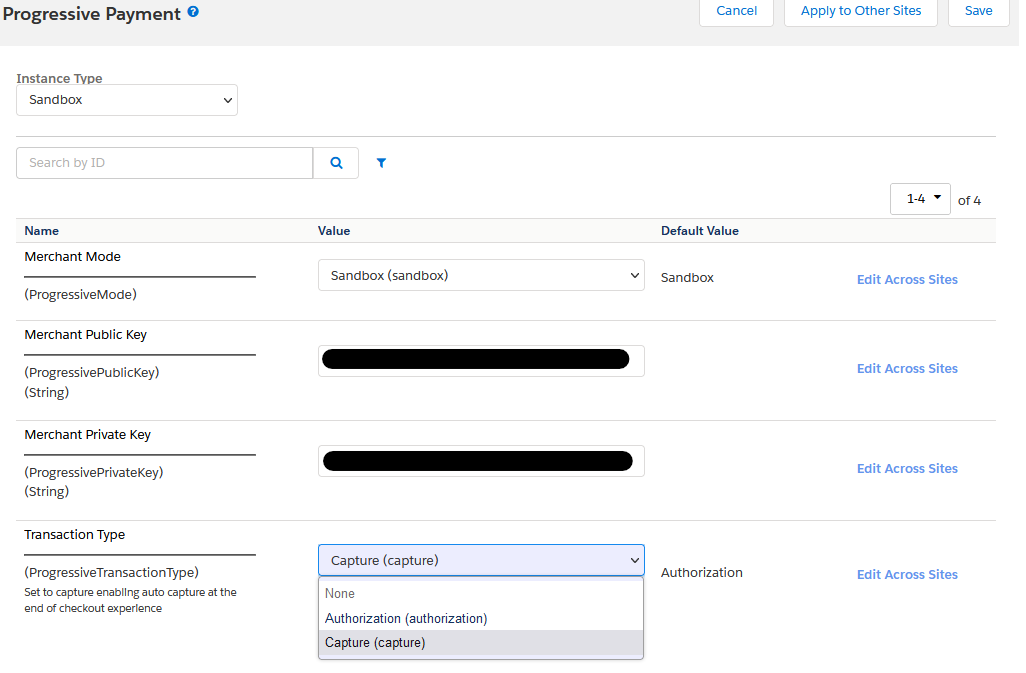
- Navigate to Business Manager > Merchant Tools > Site Preferences > Custom Site Preferences.
- Click on the PROGRESSIVE_PAYMENT and fill next fields:
- Select Merchant Mode [production or sandbox]
- Fill the merchant public key provided by Progressive Leasing
- Fill the merchant private key provided by Progressive Leasing
- Select the Transaction Type [authorization or capture]
- Authorization - places the order on hold and requires manual capture.
- Capture - completes the order automatically
- Click on Save button
Step 6: Configure Jobs
Jobs are instrumental in executing transactions on Progressive. Their role includes synchronizing order statuses and updating the charge statuses to Progressive. Note that transactions can also be carried out via the Customer Service Center independently of jobs.
A job operates within a site context, with the default site id being 'RefArch'. If you're operating with a different site id, you can change this by following these steps:
- Navigate to Business Manager > Administration > Operations > Jobs.
- Access the job you need to alter (ProgressiveCapture, ProgressiveRefund, or ProgressiveVoid).
- Click on the 'Job Steps' section.
- Find the 'RefArch' mark near 'Scope', click on it, and select the appropriate site for the job to run on.
- You also need to schedule the job's start interval by following these steps:
Go to Business Manager > Administration > Operations > Jobs.
- Select the 'ProgressiveCapture' job.
- Navigate to the 'Schedule and History' tab.
- Enable the job by clicking the 'Enable' checkbox, then select 'Recurring Interval' from the 'Trigger Select' dropdown.
- Input '1 Minute' for 'Runtime', and ensure all days are selected.
- Repeat steps 1-4 for the 'ProgressiveRefund' and 'ProgressiveVoid' jobs.
By following these steps, you've activated the job's scheduler, which will continuously synchronize the order statuses with Progressive at your specified intervals. Please bear in mind that you can set the interval to any length of time that suits you, but remember that the scheduler does not function on the sandbox.
Updated almost 3 years ago