Configuration
Here we discuss how to configure the WooCommerce Pay With Progressive Plugin.
General Configuration
In order to connect the plugin to our servers and ensure that the orders are going to the correct place, we will need to collect a few fields of information in the Admin section of WooCommerce.
To begin, we will be going to Plugins then Settings in the Progressive Leasing plugin.

The Payments for Progressive Leasing settings appear like this:
Sandbox vs Production Options
The Api Mode defaults to "Demo", which is great for sandbox.
When you upload your changes to production, you will need to change the Api Mode and the other associated options here.
Make Progressive Deals Tax Exempt
This must always be set to YES. Exceptions to this would be arranged with Progressive Finance & Accounting Teams prior to implementation. This setting ensures that customers are not double-taxed on Progressive transactions, in which Progressive taxes initial payment and all recurring payments.
If you have already talked to Progressive Merchant Support, you may already know the values you should enter in the fields. If so, go ahead and make sure to Save changes by clicking the button at the bottom.
If you need to request API keys or have questions about completing the fields, please contact Progressive at:
Once you receive the values you need to insert, put them in their respective fields and then click the Save changes button at the bottom.
Marking Items as Leasable
When the plugin is installed, additional attributes will be added to each product. These attributes include "is_leasable" and "prog_is_used". The "is_leasable" attribute controls whether or not a product is eligible to be leased with the Progressive Leasing payment method. By default, this attribute will be set to false. The "prog_is_used" attribute indicates whether or not a product is used. This attribute does not impact leasability but is important to insuring the customer has the right experience. If you do not sell used products, you do not need to make any changes to this attribute.
Now that we have the plugin connected to Progressive Leasing, we can start marking items as Leasable. This can be done in bulk by using a plugin like this one or using a .csv. For this example we will set up an individual simple product.
To do this, follow these steps for each item you want to make leasable.
- Click Products
- Click on a product
- Select Attributes from the product settings
- Select Custom product attribute
- Click Add
- Select is_leasable
- Set to true
- Make sure that 'Visible on the product page' is unchecked.
- Click Save attributes
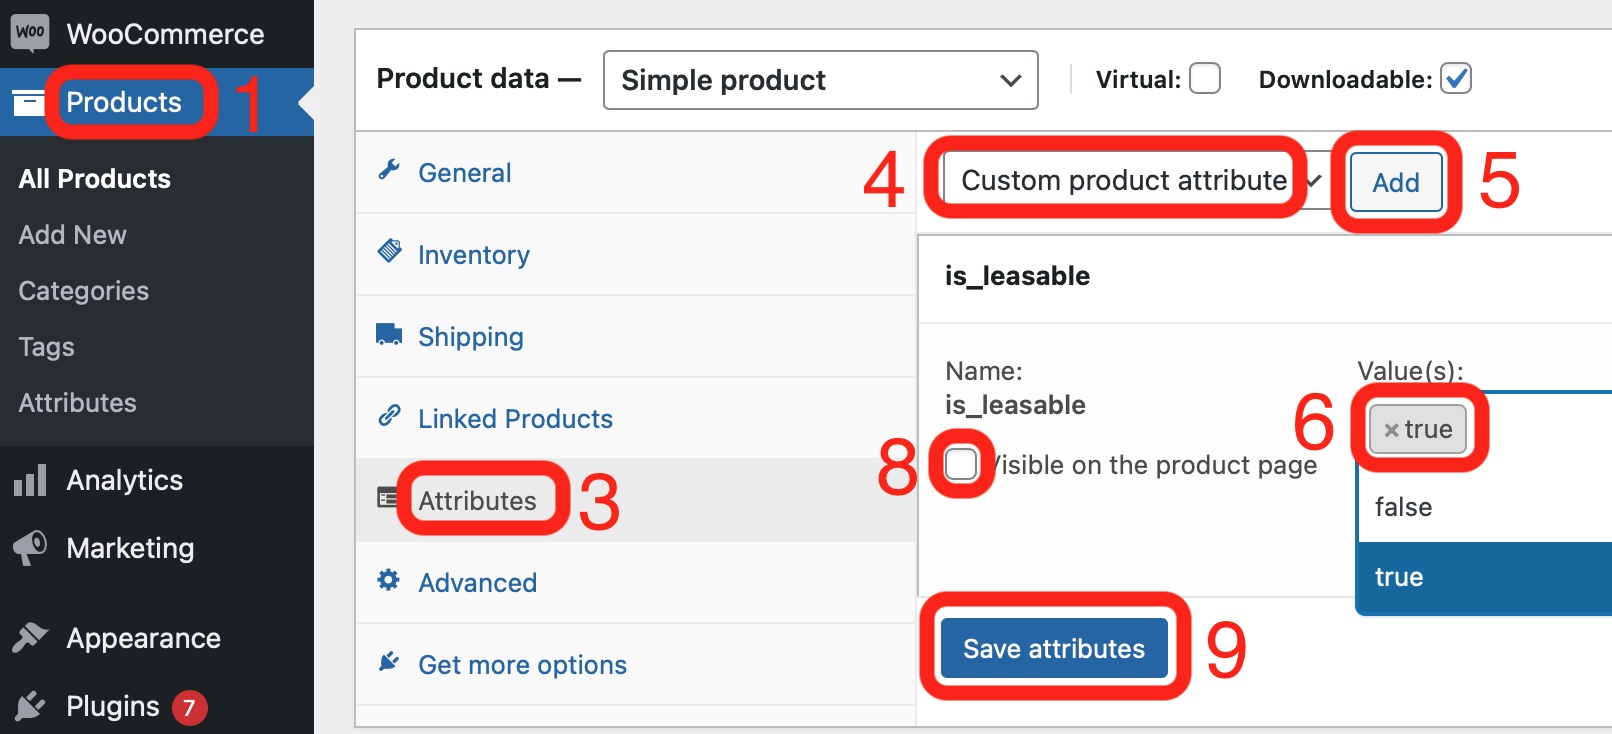
Note: do not check Visible on the product page. This will add a user-visible text with the attribute name, which is undesirable for the user experience.
Indicate your change, check the "Change" box, and save your changes.
Leasable Items
Not all items are leasable. Before issuing production keys, Progressive will walk through your leasable items to ensure proper configuration.
Progressive Leasing allows a large assortment of items to be leased, but there are restrictions.
Leasable Items Include
- Furniture
- Appliances
- Electronics
- Stereo Equipment
- Audio and DJ equipment
- Computers and Laptops
- Tablets
- Camera equipment
- Cables and cords for televisions
- Hoses for appliances
Prohibited Items:
- Drones
- Hoverboards
- Gift cards
- Firearms
- Items requiring licensing
- Items requiring permanent installation that cannot be returned ex; installed home theatre equipment and surveillance equipment
- Membership fees
- Jewelry
- Recycling fees
- Apparel
- Consumables
Managing Warranties
The PayWithProgressive Plugin supports two methods of leasing warranties. If your site has warranties in the product catalog as SKU's or line items separate from the products the warranties cover, follow the instructions in the section Marking a Warranty Product as Leasable.
If your site uses the "Returns and Warranty Requests" extension by WooCommerce, you will follow the instructions in the section Using the "Returns and Warranty Requests" extension with PayWithProgressive.
Marking a Warranty Product as Leasable
- Click on the Attributes menu item in “Product Data” box.
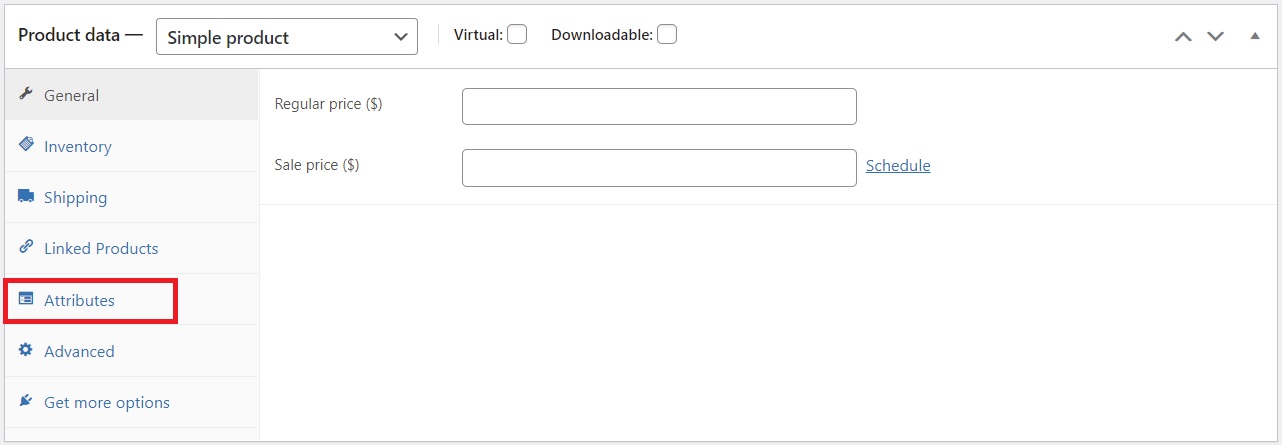
Figure - Click on "Attributes" displayed on "Product data" section
- On the attributes drop-down list, select and add the attributes “is_leasable” and “prog_is_warranty”
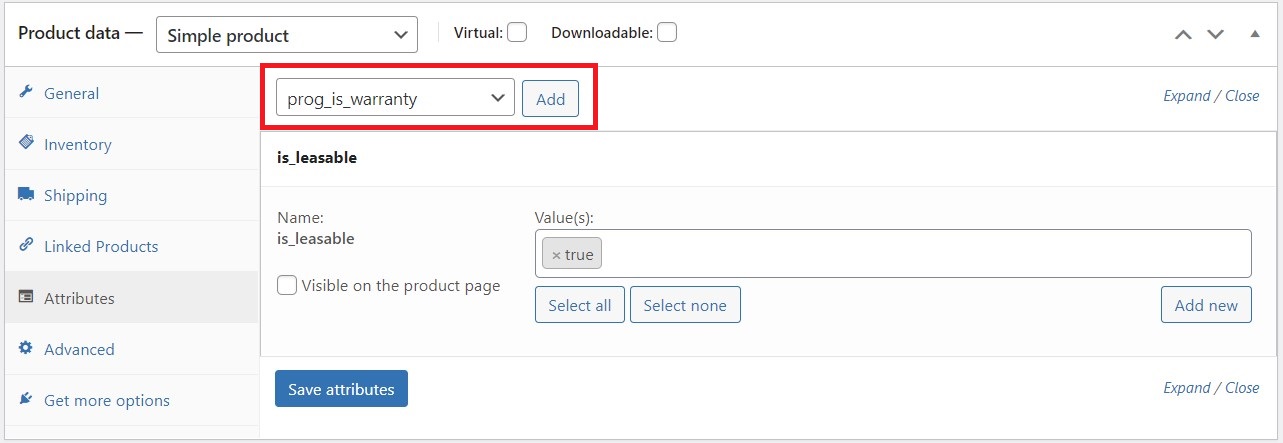
Figure - Select and add Progressive Leasing attributes "is_leasable" and "prog_is_warranty"
- Uncheck the "Visible on product page" checkbox
- In the field "Value(s)", select "true"
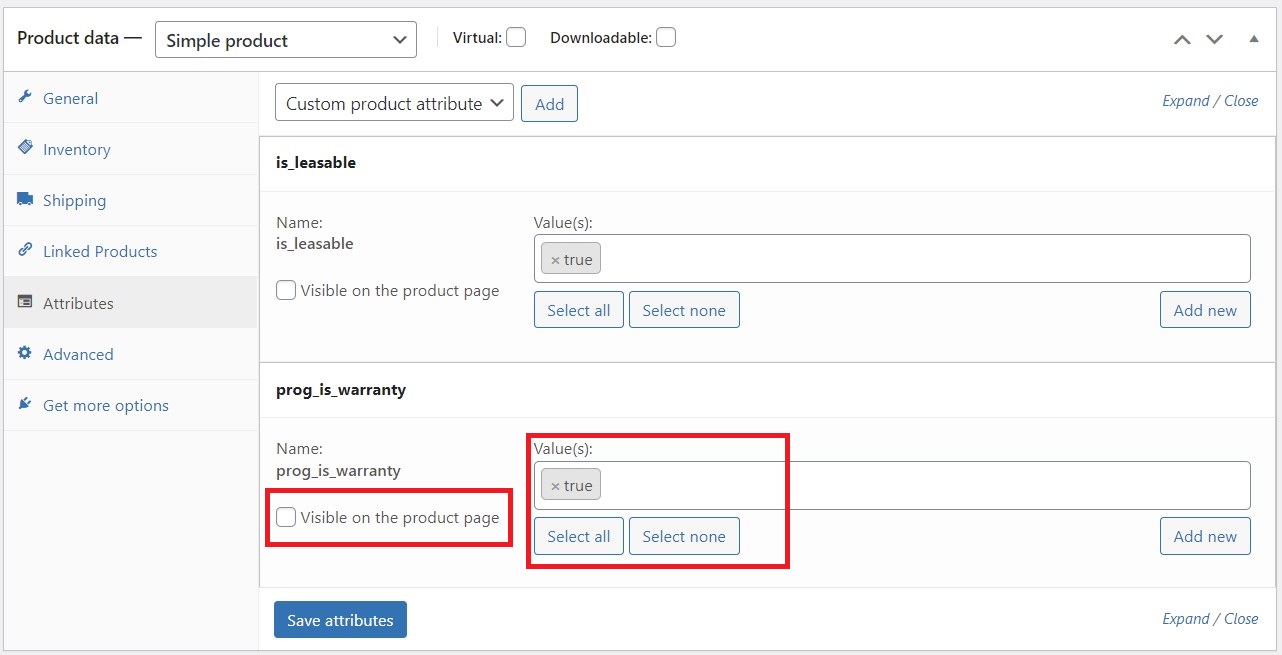
Figure - Uncheck "Visible on the product page" checkbox, and on "Value(s)" field select "true", for all Progressive Leasing attributes
- Click on the "Save attributes" button
Using the "Returns and Warranty Requests" extension with PayWithProgressive
The PayWithProgressive plugin will automatically recognize warranties that have been configured with the Returns and Warranty Requests extension. To allow these items to be leased, follow the same steps in the above section "Marking Items as Leasable".
Lease Payment Estimator
By default the Lease Payment Estimator does not show up on any product detail pages. To get a link like that added, we just need to change a couple of options in the Settings section of WooCommerce. The link we make will look similar to the link below:
In order to get that link showing up on all leasable items, in the Admin section, navigate to WooCommerce > Settings > Payments then click Manage next to the Progressive Leasing method.
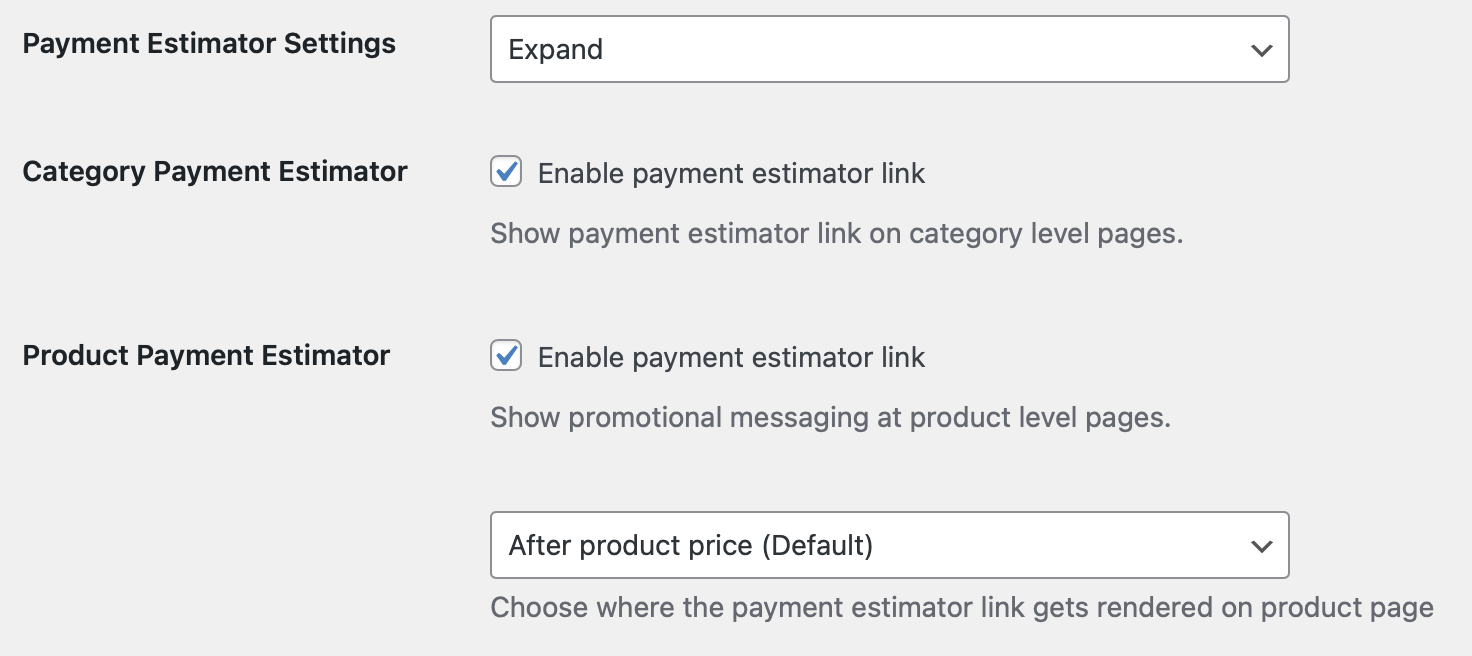
To enable the Payment Estimator, configure the following settings:
- Payment Estimator Settings: Expanded
- Check Enable payment estimator link for both Category and Product settings
Progressive recommends leaving the location of the estimator on After product price (Default). Then click Save changes.
Caching
You may have to flush your WooCommerce cache after changing settings, but once you do, there should be a link included on all product detail pages of leasable items just like the one at the beginning of this section.
Disabling the Progressive Leasing Plugin
To disable Progressive Leasing, go to Plugins and click Deactivate.

Reminder
Progressive suggests using this method to deactivate, rather than fully deleting the plugin, to ensure that Progressive lease data, including Lease IDs associated with orders, is retained.
Updated over 3 years ago